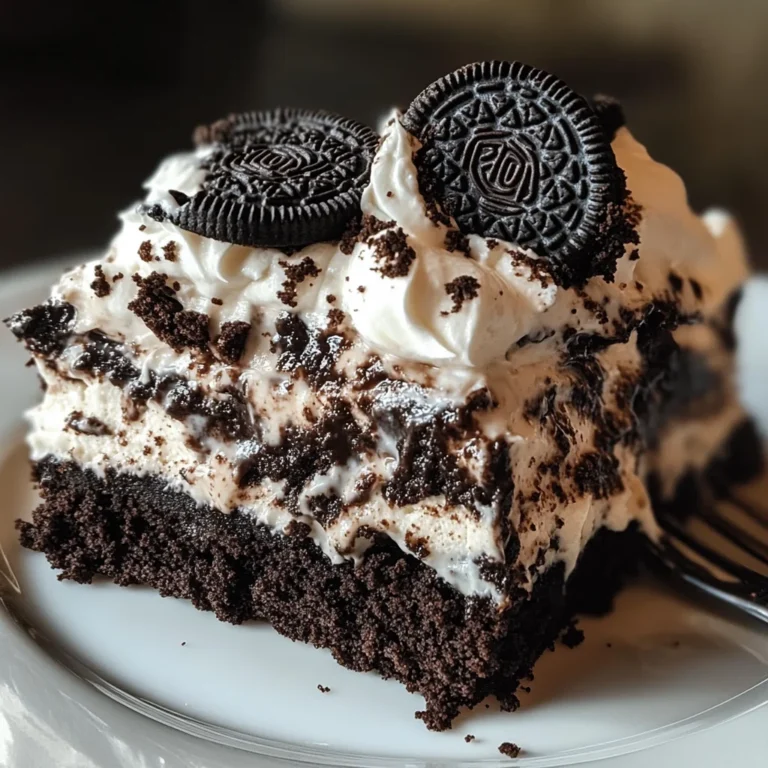
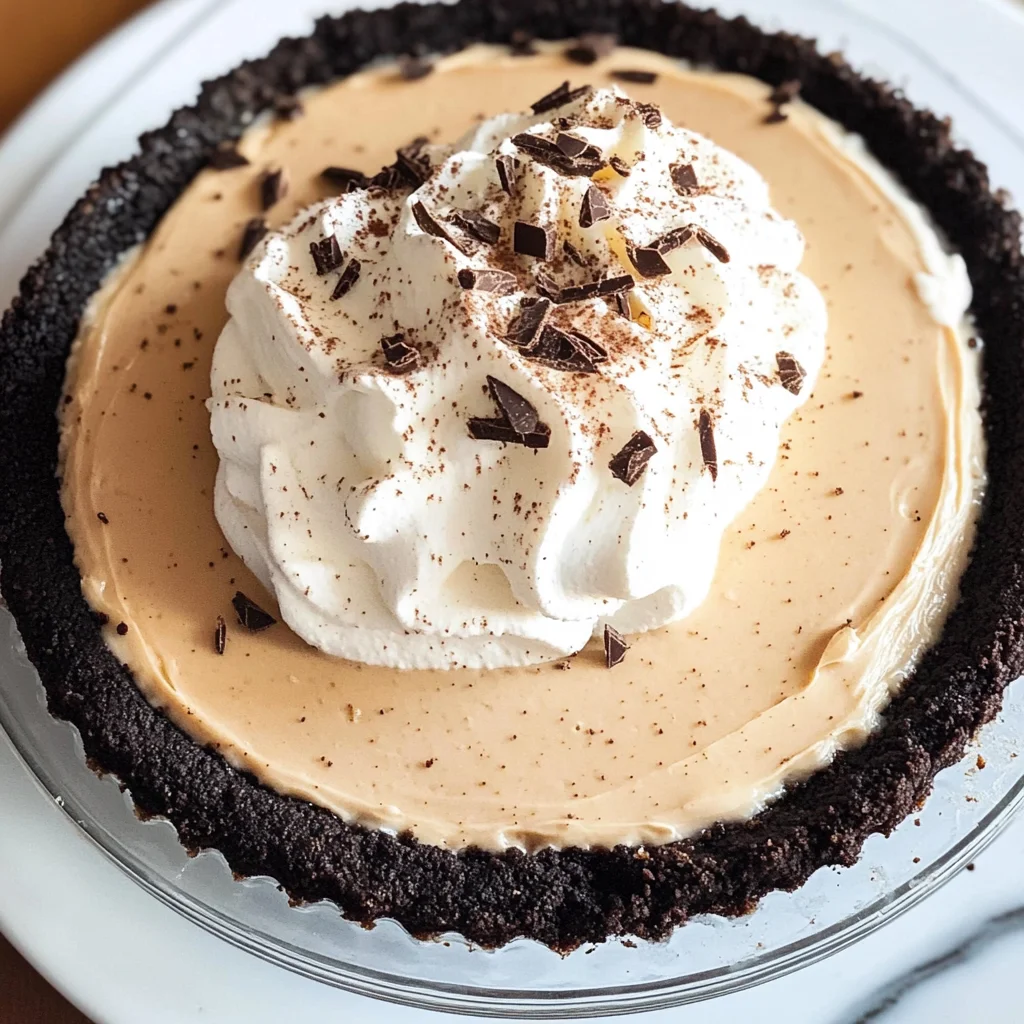
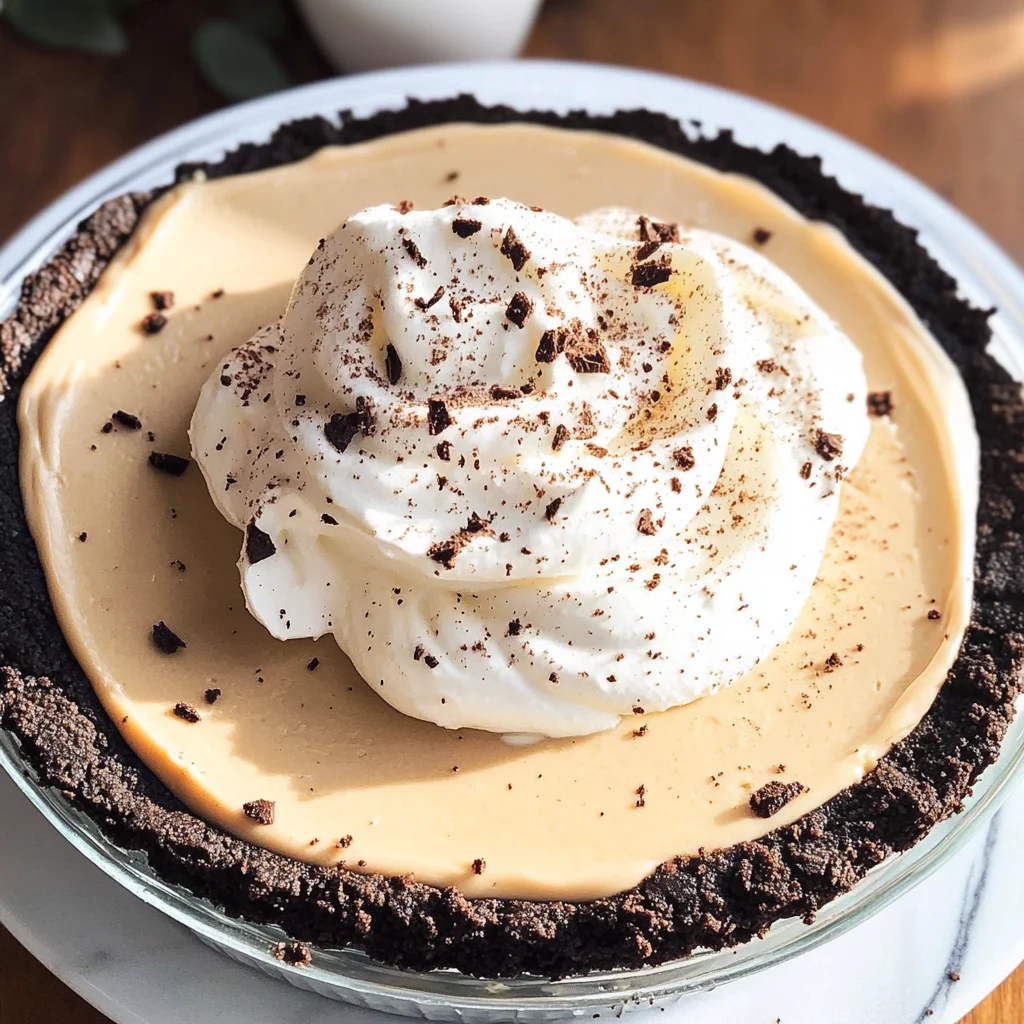
Creamy Coffee Pie Recipe (No Bake, 6 Ingredients)
If you’re looking for a dessert that’s as easy to make as it is delicious, you’ve landed in the right spot! This Creamy Coffee Pie Recipe (No Bake, 6 Ingredients) is not just another dessert; it’s a delightful experience that combines creamy goodness with a satisfying crunch. Whether you’re treating yourself after a busy week or impressing family and friends at your next gathering, this pie is sure to be a hit.
What makes this recipe truly special is its simplicity. With just six ingredients, you can whip up a frozen treat that tastes like your favorite iced coffee. Trust me, once you try it, you’ll want to keep this recipe on hand for all occasions!
Why You’ll Love This Recipe
- Easy to prepare: With only six ingredients and no baking required, you can have this dessert ready in minutes.
- Family-friendly appeal: Kids and adults alike will love the combination of chocolatey Oreos and creamy coffee.
- Make-ahead convenience: Just mix, freeze, and serve—perfect for busy weeknights or spontaneous gatherings!
- Delicious flavor: The blend of sweetened condensed milk and espresso creates an irresistible taste that’s hard to resist.
- Impressive presentation: It looks stunning when served, making it perfect for special occasions.
Ingredients You’ll Need
You won’t believe how simple and wholesome these ingredients are! Each one plays an important role in creating that dreamy texture and amazing flavor.
For the Crust
- 25 Oreos
- 4 tbsp butter (melted)
For the Filling
- 3 cups heavy cream
- ½ cup powdered sugar
- 2 tbsp instant espresso powder
- 14 oz sweetened condensed milk
Variations
This recipe is wonderfully flexible! Feel free to get creative with these variations based on your taste preferences.
- Add some flavor: Consider mixing in a splash of vanilla extract or a sprinkle of cinnamon for added depth.
- Swap the crust: Try using graham crackers or any other cookies you love instead of Oreos for a different twist.
- Make it chocolatey: Fold in some mini chocolate chips into the filling for an extra treat!
- Top it off: Garnish with whipped cream and cocoa powder or chocolate shavings for an elegant finish.
How to Make Creamy Coffee Pie Recipe (No Bake, 6 Ingredients)
Step 1: Prepare the Crust
Start by pulsing those Oreos in a food processor until they turn into fine crumbs. This step is essential because it ensures that your crust will be nice and cohesive. Once they’re crumbly, add the melted butter and pulse again until everything is combined and resembles damp sand.
Step 2: Form the Crust
Now comes the fun part! Take about two-thirds of your Oreo mixture and press it firmly into the bottom and sides of a 9-inch deep dish pie pan. Use your fingers or a tamper to really pack it down—this will give your crust stability when you add the filling.
Step 3: Whip the Cream
In either a stand mixer with a whisk attachment or using hand beaters, whip together the heavy cream, powdered sugar, and instant espresso on high until stiff peaks form. This usually takes about 6-7 minutes. This step is crucial because it gives your filling that light and airy texture!
Step 4: Combine with Sweetened Condensed Milk
Once you’ve got those stiff peaks, gently pour in the sweetened condensed milk. Whip on low speed for about 30 seconds before scraping down the sides with a spatula. Then whip again on low for another 30 seconds. This helps incorporate everything smoothly without deflating all that wonderful air you’ve just whipped in!
Step 5: Pour Filling into Crust
Carefully pour your creamy filling into the crust you prepared earlier. Smooth out the top with a spatula or get creative with some designs if you’re feeling fancy! Then pop it in the freezer uncovered for at least six hours. After it’s fully frozen, cover it with plastic wrap until you’re ready to serve.
Step 6: Serve and Enjoy
When it’s time to enjoy your pie, let it thaw for about ten minutes so it’s easier to slice. Then serve up generous pieces of this heavenly treat! Enjoy every bite—you deserve it!
Now that you’ve got all these steps down, I can’t wait for you to try this Creamy Coffee Pie Recipe (No Bake, 6 Ingredients). It’s sure to become one of your favorites too!
Pro Tips for Making Creamy Coffee Pie Recipe (No Bake, 6 Ingredients)
Creating the perfect creamy coffee pie is all about attention to detail and a few helpful tricks. Follow these tips to ensure your dessert turns out flawlessly!
- Use fresh ingredients: Fresh heavy cream and quality sweetened condensed milk enhance the flavor and texture of your pie, making it even more delicious.
- Chill your mixing bowl: Before whipping the cream, chill your mixing bowl in the refrigerator for about 10 minutes. A cold bowl helps the cream whip faster and achieve those stiff peaks more easily.
- Don’t skip the freezing time: Allowing the pie to freeze for at least 6 hours ensures that it sets properly and achieves that delightful frozen texture. Patience is key!
- Customize flavors: Feel free to mix in some finely chopped nuts or chocolate chips into the filling before pouring it into the crust. This adds a fun texture and extra flavor dimension.
- Serve with care: Letting the pie thaw for about 10 minutes before slicing makes serving easier. It prevents cracking and ensures clean slices.
How to Serve Creamy Coffee Pie Recipe (No Bake, 6 Ingredients)
Presenting your creamy coffee pie can be just as enjoyable as making it! Here are some delightful ways to serve this treat that will impress friends and family alike.
Garnishes
- Whipped cream: A dollop of freshly whipped cream on top adds a lightness and enhances the coffee flavor.
- Chocolate shavings: Adding chocolate shavings not only looks elegant but also brings a rich chocolatey flavor that complements the coffee perfectly.
- Cocoa powder dusting: A light sprinkle of cocoa powder over the top gives a beautiful finish and an extra hint of chocolate.
Side Dishes
- Fresh fruit salad: A refreshing fruit salad balances out the richness of the pie. Think berries, melons, or citrus fruits for a vibrant pop of color and taste.
- Vanilla ice cream: This classic pairing is always a hit! The creamy vanilla ice cream contrasts beautifully with the rich coffee pie while providing a cool sensation.
- Espresso shots: For true coffee enthusiasts, serving a side shot of espresso heightens the coffee experience without overpowering the dessert’s flavors.
- Chocolate-covered strawberries: These elegant treats add a touch of romance to your dessert table while offering a sweet contrast to the coffee flavors in your pie.
Now you’re all set to create, serve, and enjoy this Creamy Coffee Pie! Whether you’re hosting a gathering or simply treating yourself, this no-bake delight is sure to be a crowd-pleaser. Happy baking!
Make Ahead and Storage
This Creamy Coffee Pie is not only delicious but also perfect for meal prep! You can make it ahead of time and store it, making it an ideal treat for gatherings or a sweet surprise for yourself.
Storing Leftovers
- Keep leftovers in the freezer covered with plastic wrap.
- For best quality, consume within 2 weeks.
- If thawed, eat within 3 days for optimal freshness.
Freezing
- This pie can be frozen for longer storage.
- Ensure it’s tightly wrapped in plastic wrap to prevent freezer burn.
- To freeze individual slices, cut the pie and wrap each slice separately.
Reheating
- There’s no need to reheat this frozen dessert; simply thaw before serving.
- Allow the pie to sit at room temperature for about 10 minutes before slicing for easier serving.
FAQs
Have questions about your Creamy Coffee Pie? Here are some common queries!
Can I use decaf coffee in this Creamy Coffee Pie Recipe (No Bake, 6 Ingredients)?
Absolutely! You can substitute instant espresso powder with decaf instant coffee to enjoy this delicious pie without the caffeine kick.
How long does the Creamy Coffee Pie Recipe (No Bake, 6 Ingredients) take to set?
The pie needs at least 6 hours in the freezer to set properly. For best results, you can freeze it overnight.
Can I use other types of cookies for the crust?
Yes! While Oreos provide a great flavor, you can experiment with other cookie types like chocolate wafer cookies or graham crackers if you prefer a different taste.
Is there a dairy-free alternative for this recipe?
You can use coconut cream instead of heavy cream and almond or oat milk sweetened condensed milk as a dairy-free alternative.
Final Thoughts
I hope you enjoy making this Creamy Coffee Pie! It’s such a delightful dessert that brings together rich flavors and a smooth texture without any fuss. Whether you’re serving it at a special occasion or just treating yourself on a quiet evening, I know you’ll love every bite. Happy baking, and don’t forget to share your experience with me!
Creamy Coffee Pie Recipe (No Bake, 6 Ingredients)

Indulge in the delightful Creamy Coffee Pie Recipe (No Bake, 6 Ingredients), an effortless dessert that combines the rich flavors of coffee with a smooth, creamy filling and a crunchy cookie crust. Perfect for any occasion, this no-bake treat is not only simple to prepare but also offers a refreshing escape from traditional desserts. With just six ingredients, you’ll have a frozen pie that tastes like your favorite iced coffee without the fuss. Whether you’re entertaining guests or treating yourself after a long day, this pie will impress everyone with its luscious texture and satisfying taste.
- Prep Time: 15 minutes
- Cook Time: None
- Total Time: 0 hours
- Yield: Serves 10 1x
- Category: Dessert
- Method: No Bake
- Cuisine: American
Ingredients
- 25 Oreos (or preferred cookies)
- 4 tbsp melted butter
- 3 cups heavy cream
- ½ cup powdered sugar
- 2 tbsp instant espresso powder
- 14 oz sweetened condensed milk
Instructions
- Prepare the Crust: Pulse Oreos in a food processor until crumbly. Mix with melted butter and press into the bottom of a 9-inch pie pan.
- Whip the Filling: In a mixing bowl, whip heavy cream, powdered sugar, and espresso powder until stiff peaks form.
- Combine: Gently fold in sweetened condensed milk into the whipped mixture.
- Assemble: Pour filling into the prepared crust and smooth the top. Freeze uncovered for at least 6 hours.
- Serve: Thaw slightly before slicing and enjoy!
Nutrition
- Serving Size: 1 slice (100g)
- Calories: 345
- Sugar: 24g
- Sodium: 90mg
- Fat: 24g
- Saturated Fat: 15g
- Unsaturated Fat: 8g
- Trans Fat: 0g
- Carbohydrates: 29g
- Fiber: 1g
- Protein: 4g
- Cholesterol: 70mg